How to setup the 'Property maintenance & repair' workflow
This how-to guide will lead you through the process of setting up the ‘Property maintenance & repair’ workflow, by linking it together with the ‘Complexes’ and ‘Suppliers’ workflows. Not sure what this workflow has to offer? Read the step-by-step guide to learn more about how it can help you.
Before you can set up these workflows, you need to clone them into your account for free:
Once you’ve cloned all three workflows, log out of your Kotive account, and log back in again.
1. Copy the important field values:
In the Designer, click on the pencil icon of your freshly cloned ‘Complexes’ workflow, to open it.

Click on the ‘Complex’ form task in the left-hand panel. In the right-hand panel, you will see a paragraph titled ‘!!! IMPORTANT CHANGES you need to make BEFORE running this workflow:’ - Item number 3 contains the values that you will need to link the workflows together.
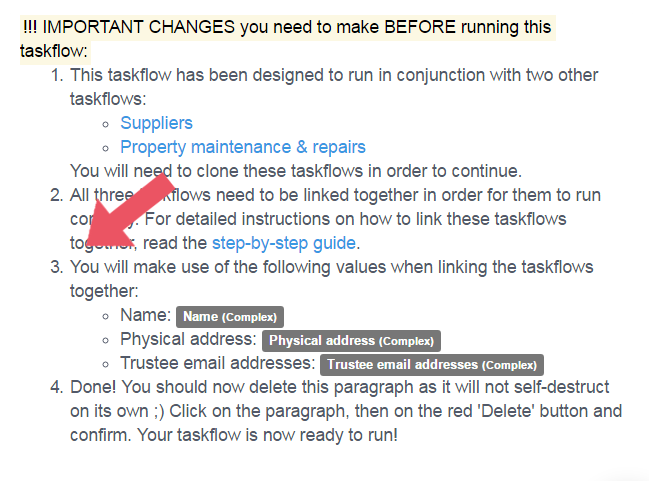
To copy these values, you need to click on the paragraph to open it. Then, click on the text of the paragraph. You’ll see that it changes from prettily formatted text, into html code. Copy all of the text from item number 3. It will look similar to this:
<li>You will make use of the following values when linking the workflows together:<ul><li>Name: {field.value:28499}</li><li>Physical address: {field.value:28497}</li><li>Trustee email addresses: {field.value:28496}</li></ul>Paste the text into a text document - Notepad works well for this, but you can also paste it into a Microsoft Word document, or a Google Docs document.
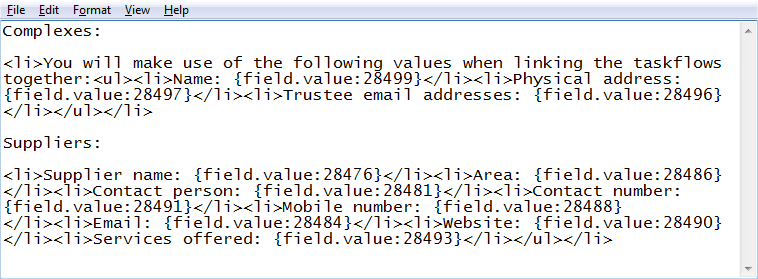
Next, you need the field values from the ‘Suppliers’ workflow. Go back to the Designer, and open the ‘Suppliers’ workflow.
Click on the ‘Register as a new supplier’ form task. Once again, click on the ‘!!! IMPORTANT CHANGES’ paragraph to open it, and then in the paragraph text to see the code. This time, the field values are listed in item number 4. The text will look similar to this:
<li>You will make use of the following values when linking the workflows together: <ul><li>Supplier name: {field.value:28476}</li><li>Area: {field.value:28486}</li><li>Contact person: {field.value:28481}</li><li>Contact number: {field.value:28491}</li><li>Mobile number: {field.value:28488}</li><li>Email: {field.value:28484}</li><li>Website: {field.value:28490}</li><li>Services offered: {field.value:28493}</li></ul></li>Paste this text into the same text document as before. Now that you have all of the important field values, it’s time to put them into the ‘Property maintenance & repairs’ workflow.
2. Link the field values in the 'Report an issue' form task:
In the Designer, open the ‘Property maintenance & repairs’ workflow.
Click on the first form, called ‘Report an issue’.
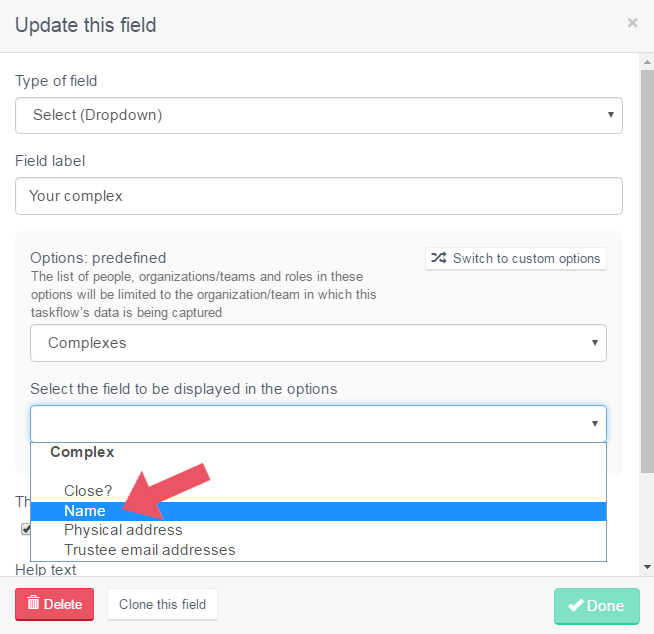
In the right-hand panel, scroll down the form to the field called ‘Your complex’ and click on it to open it.
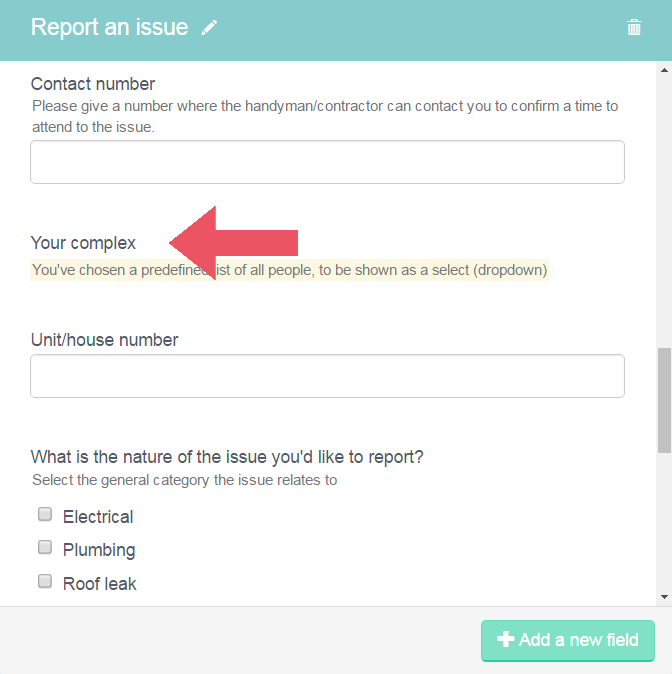
Under ‘Options: predefined’ click on the dropdown menu that currently displays the words ‘All people’, and change the selection to ‘Complexes’.
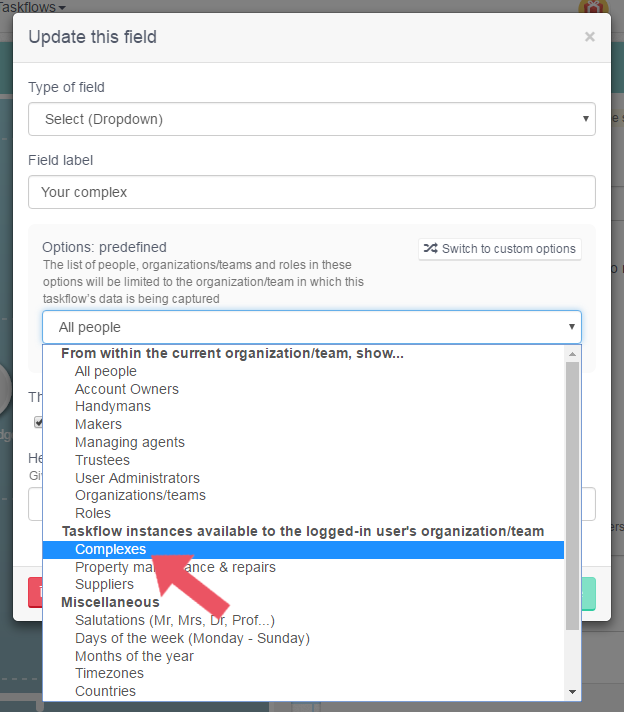
Another dropdown menu will appear directly under ‘Complexes’. Select it, and change the selection to ‘Name’. Click the green ‘Done’ button in the right-hand corner.
3. Link the field values in the 'Acknowledge report' email task:
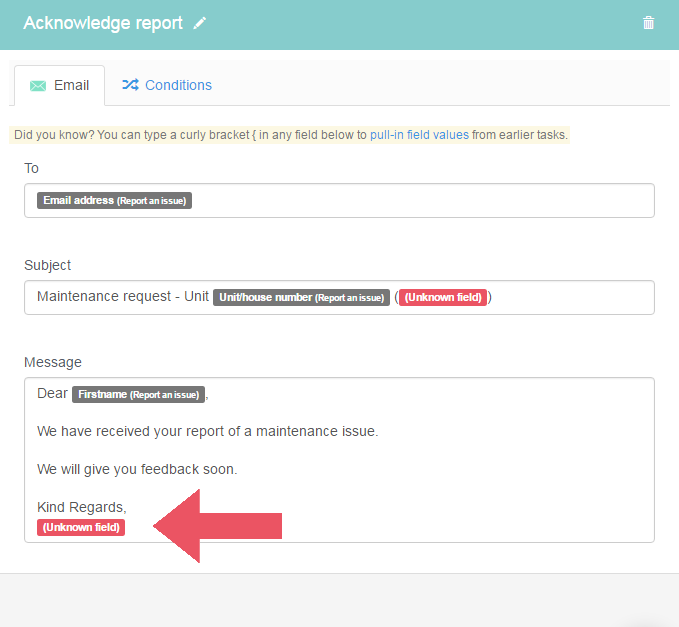
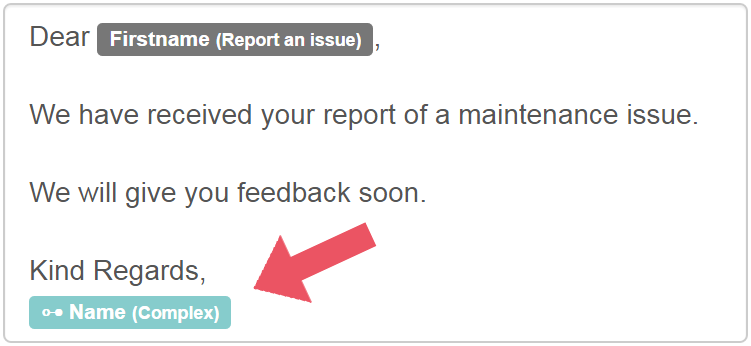
In the left-hand column, select the ‘Acknowledge report’ email task. In the ‘Message’ field, you will see a red block of text that reads ‘(Unknown field)’. This block should be a blue field called ‘Name (Complex)’.
To link this field, start by going to the text document that you pasted the important field values into. In the field values that you copied from the ‘Complexes’ workflow, find the ‘Name’ field value. It looks similar to this:
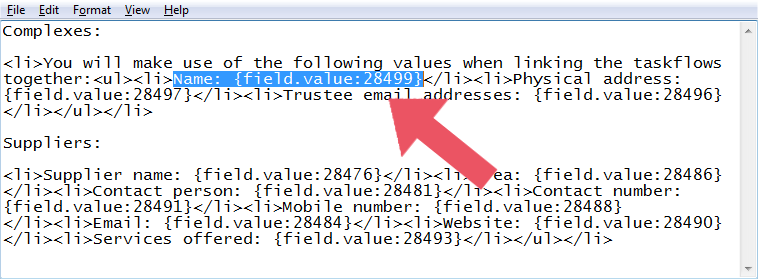
Copy the number from the field value. In this example, you would only copy 28499. The number that you copy will be different, so don’t copy the example from this guide.
To link the red ‘(Unknown field)’, click on the ‘Message’ field of the email task. At the end of the message, you will see code that looks like this: {workflowfield.value:{field.value:28450}:0} - Erase the ‘0’ from the end of the code, and replace it with the number that you copied from the ‘Name’ field value. Be careful not to erase anything other than the ‘0’, as doing so will break the code.
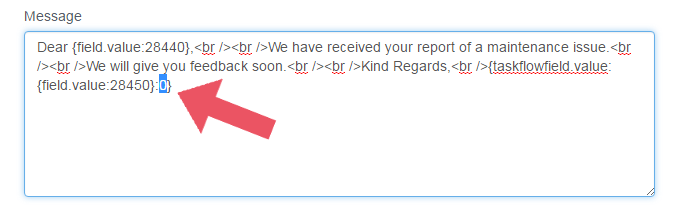
You will know that you’ve done this correctly when you click outside of the ‘Message’ field afterwards - the red ‘(Unknown field)’ will have turned into a blue ‘Name (Complex)’ field. Now that you have an understanding of how to link the red fields, the rest of the steps will be explained much more briefly.
4. Linking the other red fields:
- In the 'Acknowledge report' email task, link the last value in the 'Subject' field by replacing the '0' with the field value number from the 'Complexes' workflow called 'Name'.
- In the 'Notify trustees' email task, link the 'To' field by replacing the '0' with the field value number from the 'Complexes' workflow called 'Trustee email addresses'. Link the last value in the 'Subject' field by replacing the '0' with the field value number from the 'Complexes' workflow called 'Name'. Link the value directly after 'Complex:' in the 'Message' field by replacing the '0' with the field value number from the 'Complexes' workflow called 'Name'.
- In the 'How should the issue be handled?' form task, in the first paragraph field, link the field after 'Complex:' by replacing the '0' with the field value number from the 'Complexes' workflow called 'Name'. Scroll down to the hidden field at the bottom of the form, and link the field in the 'Predefined value' field by replacing the '0' with the field value number from the 'Complexes' workflow called 'Name'.
- Click on the sub-workflow called 'Get handyman'.
- In the 'Notify everyone' email task, link the second email address in the 'To' field by replacing the '0' with the field value number from the 'Complexes' workflow called 'Trustee email addresses'.
- Click 'UP' to go back to the main workflow, then click on the sub-workflow called 'Get contractor'.
- In the 'Choose contractor' form task, select the dropdown field titled 'Choose a contractor for this job'. Change the field that reads 'All people' to 'Suppliers', and change the new dropdown field to 'Supplier name'.
- Click on the sub-workflow called 'Quote'.
- In the 'Notify contractor - quote' email task, link the 'To' field by replacing the '0' with the field value number from the 'Suppliers' workflow called 'Email'.
- In the 'Accept or decline quote' form task, link the field directly after 'Supplier:' in the first paragraph field by replacing the '0' with the field value number from the 'Suppliers' workflow called 'Supplier name'.
- In the 'Contractor - Decline' email task, link the 'To' field by replacing the '0' with the field value number from the 'Suppliers' workflow called 'Email'. Link the value directly after 'Hi' in the 'Message' field by replacing the '0' with the field value number from the 'Suppliers' workflow called 'Contact person'.
- In the 'Managing agent - Decline' email task, link the value directly after 'You have declined the quote from' in the 'Message' field by replacing the '0' with the field value number from the 'Suppliers' workflow called 'Supplier name'.
- Click 'UP' to go back to the 'Get contractor' sub-workflow', then click on the sub-workflow called 'Repair'.
- In the 'Notify contractor - quote accepted' email task, link the 'To' field by replacing the '0' with the field value number from the 'Suppliers' workflow called 'Email'.
- In the 'Notify contractor - repair' email task, link the 'To' field by replacing the '0' with the field value number from the 'Suppliers' workflow called 'Email'.
- In the 'Notify - repairs complete' email task, link the first email address in the 'To' field by replacing the '0' with the field value number from the 'Complexes' workflow called 'Trustee email addresses'. Link the value directly after 'Feedback from' in the 'Message' field by replacing the '0' with the field value number from the 'Suppliers' workflow called 'Supplier name'.
Done! You have now linked all of the field values in the ‘Property maintenance & repairs’ workflow. Don’t forget to check all of the ‘!!! IMPORTANT CHANGES’ paragraphs for other workflow-specific instructions before running the workflows.
Having trouble linking the workflows together? Contact us, we’ll be happy to set it up for you.
